· Nas · Technology · 22 min read
How to Start Using JEV - TypeSafe's New Model: A Step-by-Step Tutorial
A complete walkthrough of getting started with Jev - signing up, running your first questions in the Playground, copying the skill prompt, getting your API keys, and handing the whole thing to your AI agent to build something real.

How to Start Using JEV: A Step-by-Step Tutorial
I wrote about what Jev is and why it matters last week - the 70-500ms responses, the $0.042 per million input tokens, the free output. The response I got back, more than anything else, was some version of: fine, but how do I actually start?
Fair. So this is the hands-on version. No theory, no benchmarks. By the end of this post you’ll have run your first Jev questions in the browser, have an API key, and have a working demo running on your own machine that your AI agent built for you.
It takes about twenty minutes, and you don’t need to write a single line of code yourself.
Here’s the path:
- Step 1: Sign Up and Get Into the Console
- Step 2: Run Your First Questions in the Playground
- Step 3: Copy the Skill Prompt from Quickstart
- Step 4: Get Your API Keys
- Step 5: Give the Skill to Your AI Agent
- Step 6: Build Your First Real Thing
- What to Do Once It Works
- Frequently Asked Questions
A quick note before we start: every prompt in this post has a Copy button next to it. Use them. Half the friction in tutorials like this is retyping things and getting a comma wrong.
Prefer to watch instead? I walk through every step of this tutorial on screen in the video below:
Step 1: Sign Up and Get Into the Console
Go to typesafe.ai and hit Sign in in the top right. That takes you to console.typesafe.ai, which is where everything actually lives - the Playground, your keys, your usage.
Sign up with an email or a Google account. Jev is still in early access, so depending on when you read this you may land on a waitlist rather than straight into the console. If you do, it’s worth signing up anyway and coming back to this post when you’re through.
Once you’re in, you’ll land on the console homepage. Two things matter on it:
- Playground - in the navigation. This is where you test questions in the browser with no code at all.
- Quickstart - a panel on the right-hand side of the homepage. This is where the skill prompt lives, and we’ll come back to it in Step 3.
Start with the Playground. Getting a feel for how Jev answers is far more useful than reading another explanation of what a System One model is.
Step 2: Run Your First Questions in the Playground
Open console.typesafe.ai/playground.
The Playground has two halves, and understanding the split is the whole game:
- State - the raw, unstructured thing you want judged. A customer email, a support ticket, a product description, a chunk of JSON from your app. Anything.
- Questions - what you want to know about that state, written as typed questions in JSON.
You put the scenario in State, the questions in Questions, and hit run. That’s it.
First, put a scenario in the State section
This is the bit people get wrong on their first try - they paste the questions and leave State empty, then wonder why nothing useful comes back. The State section is where your customer message goes. The questions are just the lens you look at it through.
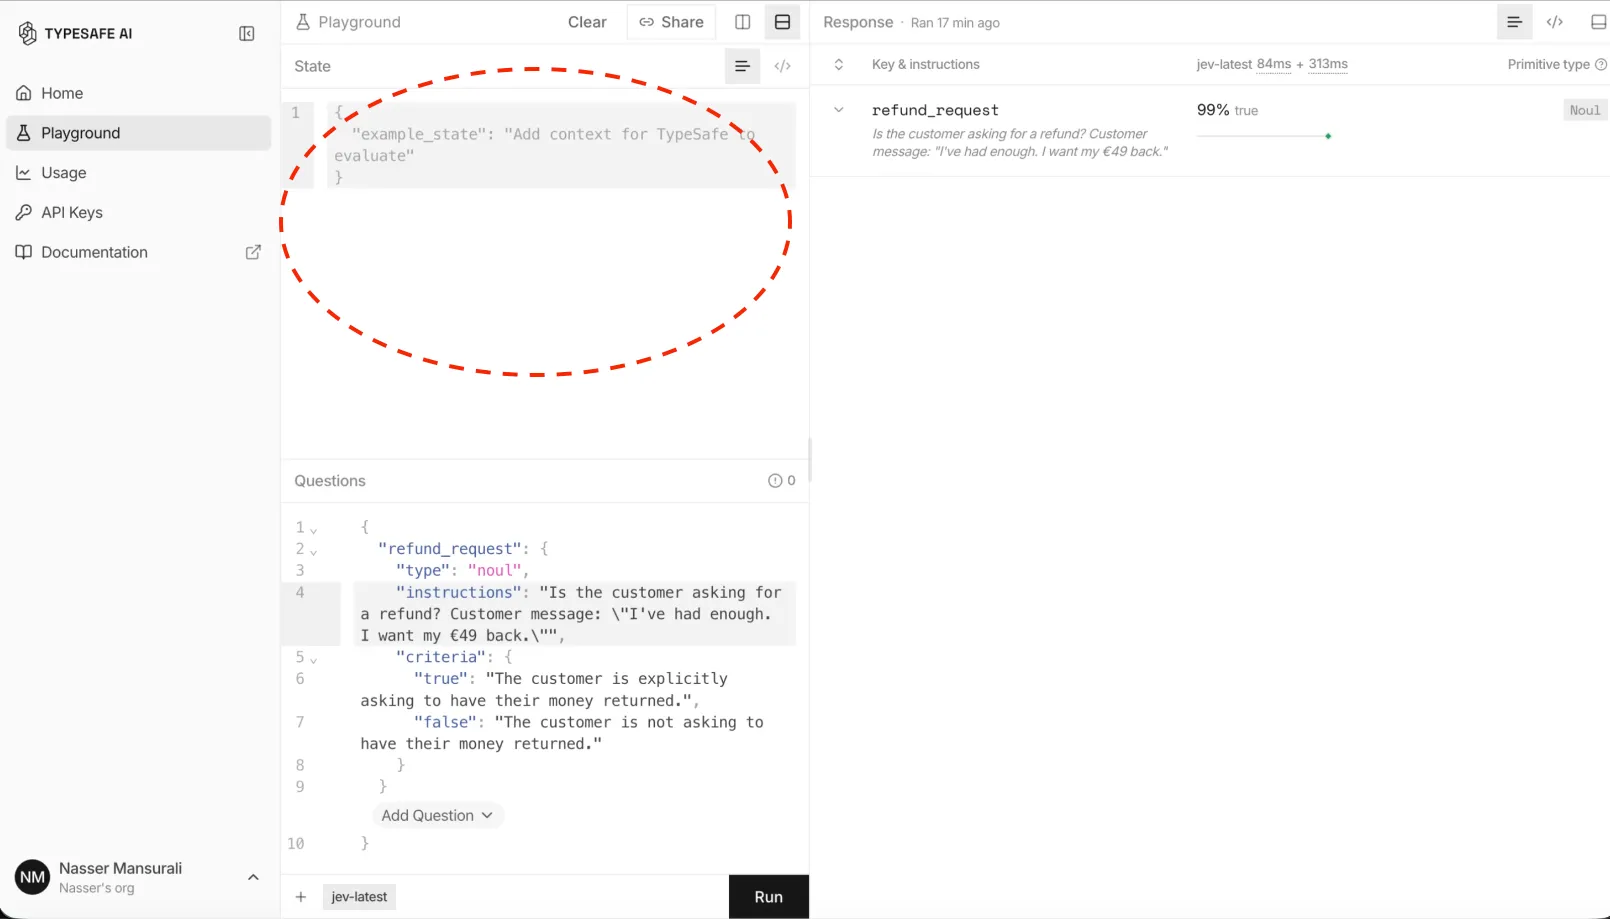
That’s the box circled above. Everything you want judged goes in there; everything you want to know about it goes in Questions below.
Here’s a message to paste into State to follow along:
Now the questions. Jev gives you three types, and honestly that’s the entire concept you need to learn. Let’s do one of each, against that same message.
Question type 1: Noul (a yes/no with a probability)
A noul answers a true/false question and returns a number between 0 and 1 - how confident it is that the statement is true. Paste this into the Questions section:
Run it. You’ll get back something close to 0.99. Not the word “yes” - a number you can put straight into an if-statement.
Notice the criteria block. You don’t strictly need it on a noul, but spelling out what “true” and “false” actually mean is the single cheapest way to make your answers more reliable. Vague question in, vague judgment out.
Question type 2: Choice (pick one from a list)
A choice picks one option from a set you define, and hands back the full probability distribution across all of them. This is your router.
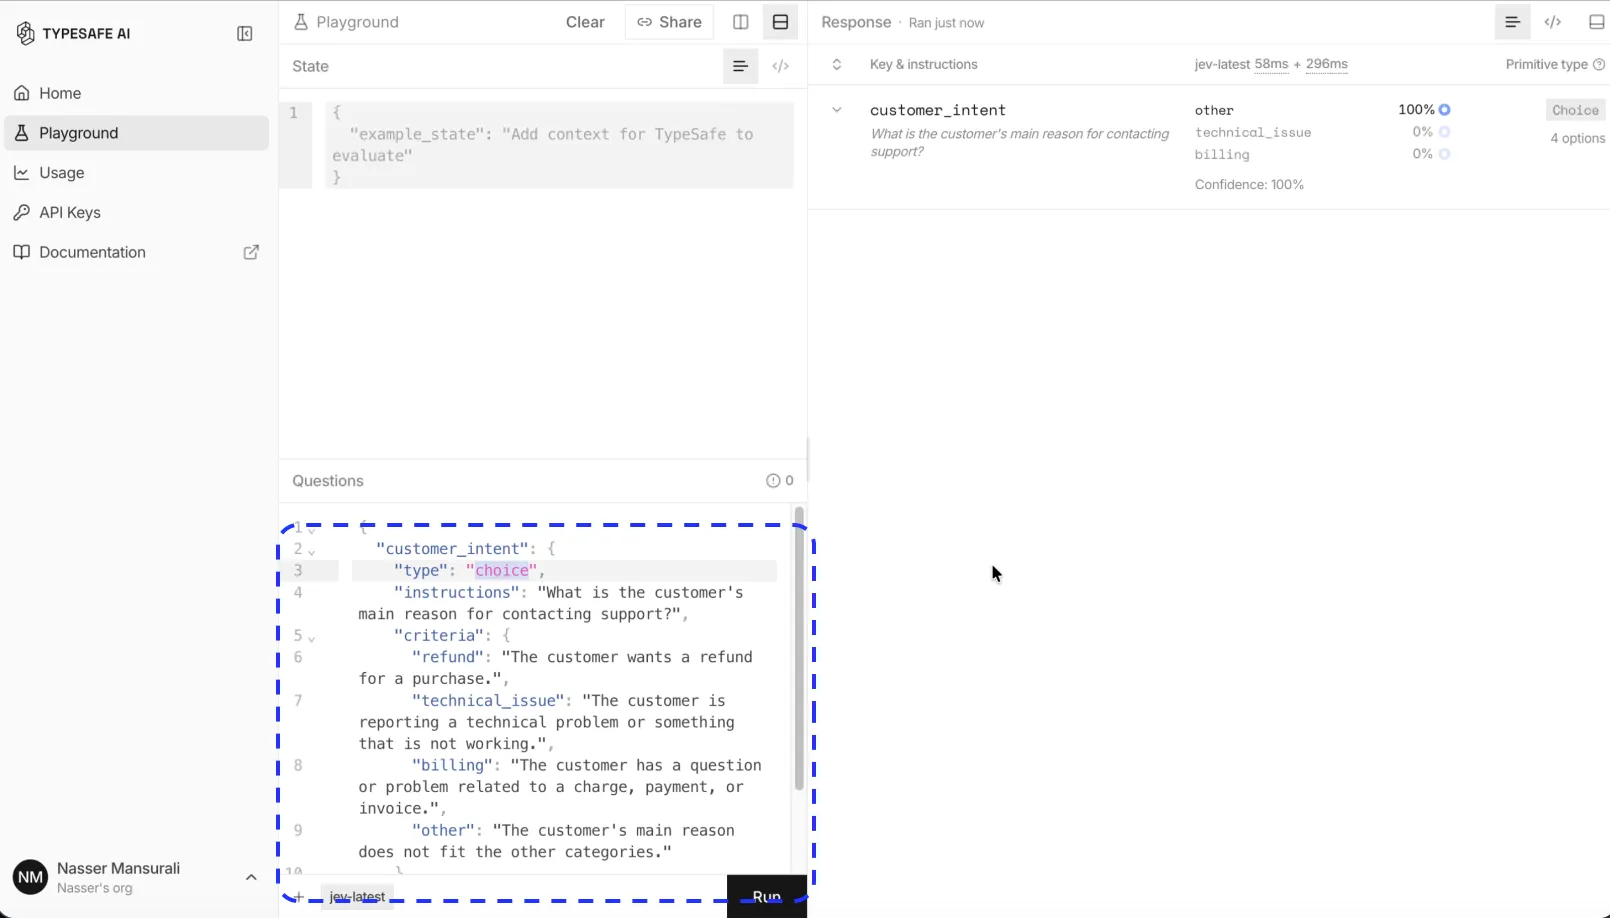
Paste it into the Questions panel, hit Run, and the answer appears on the right: the chosen category, the probability for every option you defined, and a confidence figure - along with the latency, which is the bit worth watching.
The important property here: Jev cannot return a category you didn’t define. There is no fifth option for it to invent. That’s the no-hallucination guarantee in practice - it’s structural, not a promise about behaviour.
Try running this one against a few different messages. A billing complaint that’s also angry is a genuinely interesting test, because you’ll see the probability split between refund and billing rather than getting a confident single answer. That split is information, not a failure.
Question type 3: Score (rate it on a rubric)
A score rates the state along an ordered scale you write yourself. Each level gets its own description.
Against the message above you should land somewhere near a 5. The returned score isn’t a clean integer, by the way - it’s probability-weighted across the levels, so a 4.6 means it’s sitting between “very frustrated” and “threatening to leave”. Which is more honest than forcing it to pick one.
Now do the thing that actually clicks
Put all three questions in at once. Jev evaluates them together against the same state in a single call, and you get back all three typed answers. Here’s the full set:
Three judgments, one request, back in under half a second. Now swap the State for a polite question about a delivery date and run it again. Then a spam email. Then something from your own inbox.
That’s the exercise, and it’s worth spending ten minutes on. You’re not testing whether Jev is smart - it is. You’re building an instinct for what a good instructions line looks like and how much your criteria wording changes the answer. That instinct is the only skill here, and the Playground is a much faster place to learn it than your codebase.
Something to plug it into
Build your beautiful website today
A model this fast only matters once you have something real running. My complete step-by-step pack takes you from a blank screen to a live website on your own domain - plus a private 1-on-1 call with me.
Build My Website With Claude →Lifetime access · Beginner friendly · No code needed
Step 3: Copy the Skill Prompt from Quickstart
Back to the console homepage.
On the right-hand side there’s a Quickstart panel. Inside it is a short prompt designed to be copied and pasted straight into your AI coding agent - Claude Code, Cursor, Codex, whichever you use. It tells your agent to install the official TypeSafe skill.
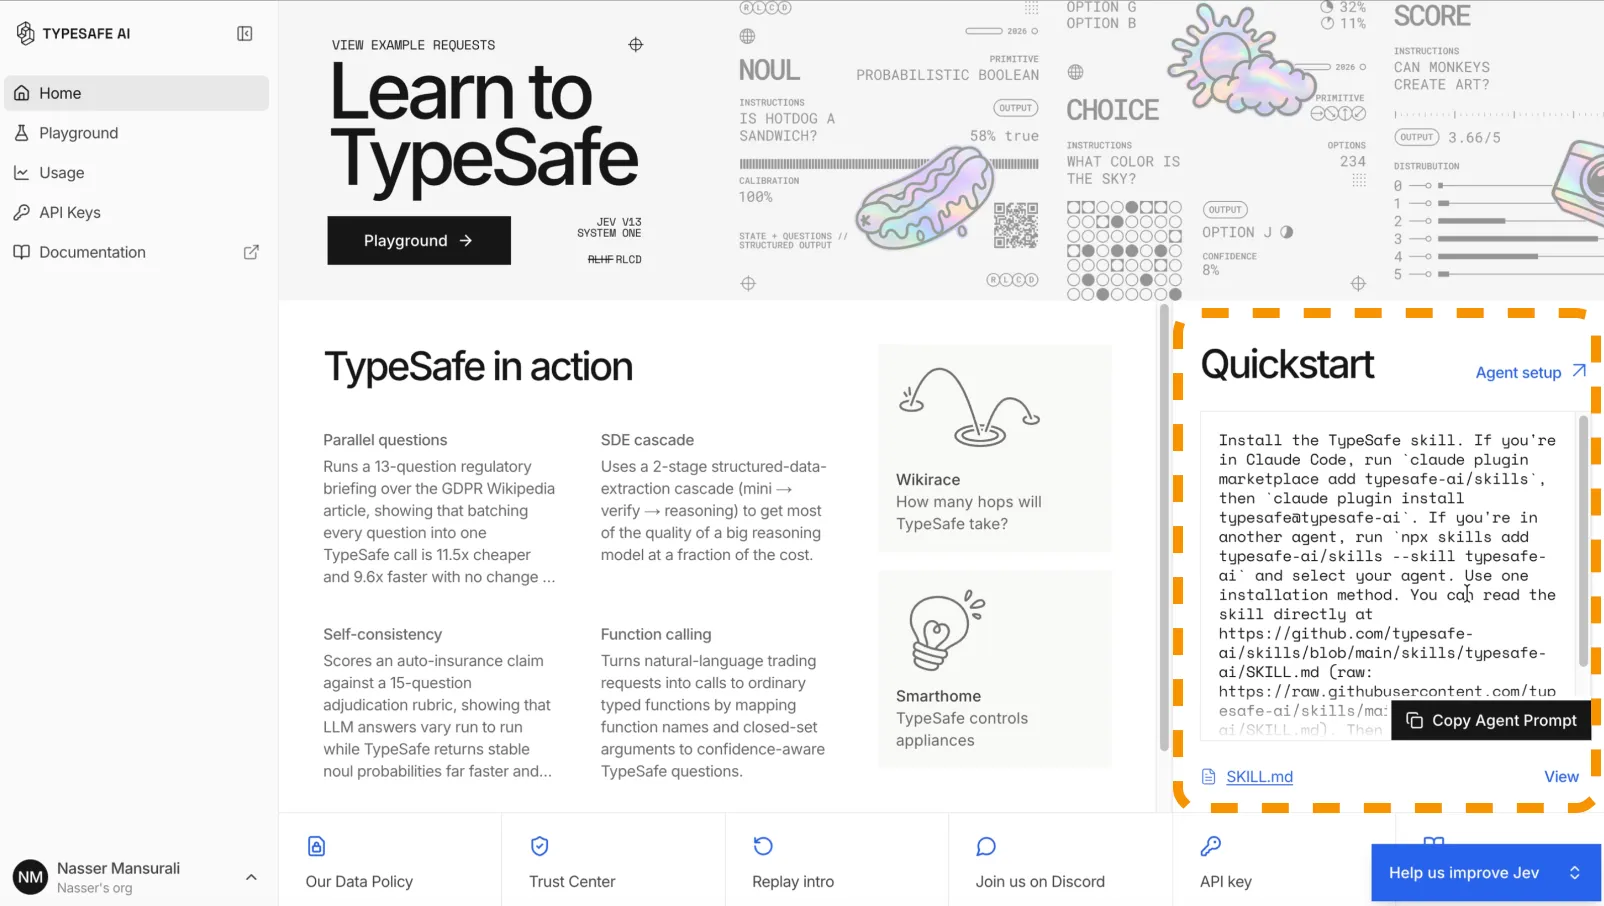
Hit Copy Agent Prompt at the bottom of that box and it’s on your clipboard. There’s also an Agent setup link in the top right of the panel if you want the longer installation guide, and a SKILL.md link underneath if you’d rather read what you’re about to install first.
Here it is too, so you don’t have to go hunting:
What is this skill, and why does it matter? A skill is a package of instructions and reference material that teaches your agent how to do something properly. Without it, your agent writes Jev code from whatever it half-remembers about a model that launched a week ago - which is to say, badly. With it, the agent knows the exact request shape, the three question types, the confidence patterns, and where the live docs are. It’s the difference between an integration that works and an afternoon of debugging invented API parameters.
If skills are new to you entirely, I’ve written a beginner’s guide to downloading and using skills that covers the concept properly.
Don’t paste it yet. Get your keys first, then do both in one go.
Step 4: Get Your API Keys
In the console, go to API Keys, or straight to console.typesafe.ai/keys.
Click Create key, give it a name you’ll recognise later (local-dev is fine), and copy it the moment it appears. Like most API keys, you get exactly one look at it - close the dialog without copying and you’ll be generating a new one.
Now set it as an environment variable. On Mac or Linux, in your terminal:
export TYPESAFE_API_KEY="your-key-here"On Windows PowerShell:
$env:TYPESAFE_API_KEY="your-key-here"The Python and JavaScript SDKs both read TYPESAFE_API_KEY from the environment automatically, so once it’s set you never type the key into a file.
Three rules, and I mean these. Never paste an API key directly into your code. Never commit one to GitHub. If you’re putting the project in a repo, make sure .env is in your .gitignore before your first commit, not after. Leaked keys get scraped off public repos within minutes by bots that do nothing else all day.
While you’re in the console, have a look at the usage page too. At $0.042 per million input tokens with free output you’re unlikely to hurt yourself, but knowing where the number lives is a good habit.
Step 5: Give the Skill to Your AI Agent
Open your project folder in Claude Code - or Cursor, or whatever you’re using. If Claude Code itself is new to you, start with my full Claude Code tutorial for beginners and come back.
Paste the skill prompt from Step 3 into the chat and hit enter.
Your agent will run the install commands, pull down the TypeSafe skill, and confirm it’s available. In Claude Code you’ll see it register as a plugin skill, and you can invoke it explicitly with /typesafe:typesafe-ai any time you want to force the issue.
Two things worth doing right after:
Check the key is visible to the agent. Ask it: “Can you confirm TYPESAFE_API_KEY is set in this environment?” Terminal environment variables don’t always follow you into every tool, and finding out now saves a confusing ten minutes later.
Tell it what you’re building in your project file. If you keep a CLAUDE.md file - and you should - add a line noting that this project uses TypeSafe for structured decisions. It saves re-explaining yourself in every new session.
Step 6: Build Your First Real Thing
Here’s where it stops being a tutorial and starts being useful.
The mistake almost everyone makes at this point is going too big - wiring Jev into their live inbox or real CRM on day one, then losing a weekend to debugging something they never got to see working. So the prompt below does the opposite. It builds a small, contained demo on fake data, on your own machine, that touches nothing real.
Paste this into your agent:
A few things about that prompt are deliberate, and they’re worth stealing for your own work:
It asks to see the request shape before the loop. That one line - “show me the exact Jev request/response shape you’re using before wiring it into a loop” - is the highest-value sentence in the whole prompt. You get a checkpoint before your agent runs the same possibly-wrong call twenty-five times.
It measures latency and cost per call. Reading “70 to 500 milliseconds” in a blog post does nothing. Watching twenty-five emails get classified in the time it takes to blink, with a cost figure that rounds to zero, is what makes it land. The extrapolation to 1,000 and 10,000 emails is where you’ll actually start having ideas.
It fences the scope, twice. No writes outside the project folder, no real data, no persistence, and an explicit “don’t build anything beyond this.” Agents are enthusiastic. Left unbounded, you asked for a demo and got a half-finished CRM integration.
It ends with what comes next. Telling the agent what the next step might be, while clearly deferring it, stops it from either forgetting the direction or building it prematurely.
Give it a few minutes. When it’s done, open the localhost URL it gives you and look at the table.
What to Do Once It Works
That demo is a toy, but it’s a toy in the exact shape of something real. The obvious next moves, roughly in order of how much they’ll teach you:
Break it on purpose. Add three or four emails that genuinely don’t fit any of your categories - a calendar invite, a newsletter, something in another language. Watch what the probabilities do. Confident wrong answers are the failure mode that matters, and you want to meet it on fake data.
Add a confidence gate. Pick a threshold - 0.85 is a reasonable starting point - and have the demo split its output into “acted on automatically” and “needs a human”. This is confidence-gated routing, and it’s the pattern that turns a classifier into an actual automation. It’s the single most useful thing in the TypeSafe docs.
Swap the domain. Same code, different data. Run it over product reviews, job applications, form submissions, support tickets. The plumbing doesn’t change at all, which is rather the point.
Then, and only then, point it at something real. Anonymised first. If you’ve built automations with tools like Zapier before - here’s how I approach that - Jev slots into the judgment step those workflows always had to fudge.
And if you want the bigger picture on where this fits alongside agents and MCPs, start here.
Your turn to build
Build your beautiful website today
Tools change every month. Having something of your own that's actually live doesn't. My complete step-by-step pack takes you from a blank screen to a real website on your own domain - with a private 1-on-1 call with me included.
Build My Website With Claude →Lifetime access · Beginner friendly · No code needed
Want to build it together, live? Apply for the 1-month mentorship → · Prefer it done for you? Get in touch →
Frequently Asked Questions
Do I need to know how to code to use JEV?
Not for the Playground. Signing up, pasting a customer message into the State section, and running the three question types takes ten minutes and involves no code whatsoever. Past that point you need code to call the API - but as this tutorial shows, your AI agent can write all of it if you install the TypeSafe skill first and describe what you want clearly.
What is the State section in the JEV Playground?
State is the unstructured input you want Jev to judge - a customer message, an email, a support ticket, a chunk of JSON from your application. It’s separate from Questions, which is where you define what you want to know about that state. The most common beginner mistake is leaving State empty and wondering why the answers are meaningless: the questions are only the lens, State is the thing being looked at.
What’s the difference between noul, choice, and score?
A noul answers a true/false question and returns a probability between 0 and 1. A choice picks exactly one option from a list you define and returns the full probability distribution across your options. A score rates the input along an ordered rubric you write, returning a probability-weighted value. All three come back with confidence attached, and all three can only return values from the space you defined in advance.
Where do I get my TypeSafe API key?
From the console at console.typesafe.ai/keys. Click Create key, name it, and copy it immediately - you only get one look. Then set it as the TYPESAFE_API_KEY environment variable, which both the Python and JavaScript SDKs read automatically. Never hardcode it in a file or commit it to a repository.
What is the TypeSafe skill prompt and do I need it?
It’s a short prompt in the Quickstart panel of the console homepage that tells your AI agent to install TypeSafe’s official agent skill. You don’t technically need it, but you want it. Jev launched in September 2026, so most agents have little or no reliable knowledge of its API. The skill gives your agent the current request shapes, the question types, the confidence patterns, and links to the live documentation - which is the difference between working code and a debugging session over invented parameters.
Can I use JEV with Cursor or Codex instead of Claude Code?
Yes. The skill installs into Claude Code as a plugin via claude plugin install typesafe@typesafe-ai, and into other agents with npx skills add typesafe-ai/skills --skill typesafe-ai, which prompts you to select your agent. The skill prompt in the Quickstart panel covers both paths, so you can paste the same thing into any of them.
Is JEV free to try?
Jev is in early access, so availability depends on getting through the sign-up. On cost, it’s $0.042 per million input tokens with free output tokens, which means a tutorial like this one - a few dozen Playground runs and a twenty-five-email demo - costs a rounding error. Check the usage page in the console if you want to see the actual figure.
Can I replace Claude or GPT with JEV?
No, and you wouldn’t want to. Jev doesn’t generate text, write code, or hold a conversation - it returns typed judgments. The pattern that works is using both: Jev makes the fast, cheap decision about whether and where to act, and your LLM does the expensive generative work only when Jev’s confidence says it’s warranted. I go into that split in more detail in my first post on Jev.
Nas’ Note
The part of this that surprised me wasn’t the speed. It was how quickly the Playground changes how you think.
You spend ten minutes writing questions against real messages and you start noticing decision points everywhere - places in your own work where you’ve been either guessing, using a brittle rule, or paying a frontier model three seconds and real money to do something a calibrated number would have settled instantly.
That’s the actual value of Step 2, and it’s why I’d push back on skipping straight to the code. The API is easy. Knowing what to ask it is the skill, and you build that faster in a browser tab than in a codebase.
So: sign up, put a real message in the State box, run the three questions, and pay attention to what you start wanting to build. Then hand the prompt in Step 6 to your agent and go make a cup of tea.
Twenty minutes, and you’ll know whether this belongs in your stack.
Liked what you just saw? Follow me on Youtube or connect on LinkedIn for more insights on building with AI.
Video Guides you might like:
 How to use Claude Code to build Apps
  10 Best Claude Code Skills for beginners
  How to create AI Video Animations with Claude + Remotion
  How to use Claude Code to build a Website
  How to use Claude Skills for beginners
  How to write the PERFECT CLAUDE.md file
  Automate 80% of your Marketing with Claude
  How to use Claude Code — The basics
  Work 2X Faster with Claude Cowork
  How to NEVER Hit Claude Usage Limits Again