· Nas · Technology · 14 min read
Claude Code Full Tutorial for Beginners - Non-Technical Friendly
Everything you need to know about Claude Code as a beginner - pricing, setup, modes, slash commands, CLAUDE.md, skills, context management, and a step-by-step workflow to go from idea to launched app.

Claude Code Full Tutorial for Beginners — Non-Technical Friendly
With Claude Code you can build fully working websites and apps in minutes, basically just by prompting. But when I look at most tutorials online, they’re either overcomplicated explanations of complex workflows, or shallow guides that don’t go deep enough to actually be useful.
So in this post I’m breaking down everything you need to know as a beginner to extract the most out of Claude Code in the shortest timeframe possible — in a way that’s clean, concise, and gets your setup running by the time you’re done reading.
Watch the Video Tutorial and Follow Along
Here’s what we’ll cover:
- Pricing and Usage Limits
- Downloading Claude Code and Setting Up an IDE
- Claude Modes and Effort Levels
- Core Features and Slash Commands
- The CLAUDE.md File
- Claude Skills
- Managing Context
- The 5-Step Workflow: From Idea to Launch
Pricing and Usage Limits
Claude Code requires a paid Claude subscription — there’s no free tier that gives you access to it. Here’s a quick breakdown of the plans:
| Plan | Price | What You Get |
|---|---|---|
| Pro | $20/month | ~45 messages per 5-hour window, shared with claude.ai |
| Max 5x | $100/month | 5x the usage of Pro, access to Claude Opus |
| Max 20x | $200/month | 20x the usage of Pro, all models, heavy daily use |
| Team | Per seat | Centralized billing, higher limits for multiple users |
A few things to keep in mind as you use it:
- Usage is shared across the account — not per project. So if you’re working on LeadLanding and Selling With Nas in parallel, they draw from the same pool.
- There are hourly and weekly limits, not just message limits. You can hit a ceiling mid-session, especially on the Pro plan during intensive build sessions.
- You’re never fully blocked — once you hit your limit, Claude offers extra usage at standard API rates, so you can keep working without interruption.
My recommendation: start on the Pro plan, get a feel for how much you actually use it, then upgrade once you’re building daily.
Downloading Claude Code and Setting Up an IDE
Claude Code works inside an IDE (Integrated Development Environment) — basically, a code editor. There are three main options:
- VS Code — free, open-source, the most popular editor in the world. Best for beginners.
- Cursor — a paid AI-native editor built on top of VS Code. Has a few extra AI features baked in.
- Windsurf (formerly Codeium) — another AI-native editor, similar positioning to Cursor.
For beginners, I recommend VS Code. It’s free, it’s stable, and the Claude Code extension integrates cleanly into it.
Setting Up VS Code and Claude Code
Step 1: Download VS Code
Go to code.visualstudio.com, download it for your operating system, and install it. It’s free and takes about two minutes.
Step 2: Install the Claude Code Extension
- Open VS Code
- Click the Extensions icon in the left sidebar (or press
Cmd+Shift+Xon Mac /Ctrl+Shift+Xon Windows) - Search for “Claude Code”
- Click Install on the one published by Anthropic
Step 3: Open Your Project Folder
Go to File → Open Folder and select your project directory. If you don’t have one yet, create an empty folder on your Desktop and open that — Claude needs a place to put files.
Step 4: Start Claude Code
Click the Claude icon in the left sidebar. A chat panel opens. Sign in with your Claude account the first time (browser pops up, log in once, and you’re connected permanently).
Step 5: Move Claude to the Right Sidebar
One small but important setup tip: move the Claude panel to the Secondary Sidebar (the right side of VS Code) so it stays visible while you’re editing. Right-click the Claude icon and select “Move to Secondary Sidebar.” Now you can see your files on the left, Claude on the right, and everything in one view.
You’re now ready to build.
Need help getting your Claude Code setup running?
Get in Touch Today →Claude Modes and Effort Levels
This is one of the most important things to understand — and most beginners skip it entirely.
The Four Permission Modes
Claude Code has different modes that control how much autonomy it has when making changes to your project:
Ask Before Edits — Claude proposes every change and waits for your approval before touching any file. Best for beginners or sensitive parts of a project. You access this via the extension settings or by typing /generalconfig.
Edit Automatically — Claude makes changes without asking each time. You still see what changed, but it doesn’t wait for you to confirm before acting. Good for faster iterations when you trust what you’re doing.
Bypass Permissions — Claude can run commands, edit files, and take actions without restrictions. This is the most powerful mode but also the least safe. Only use it on isolated projects when you know what you’re doing.
Plan Mode — This is different from the others. Instead of writing code, Claude researches, prepares a plan, and presents it to you for review before a single line of code is written. You can ask questions, suggest changes, and refine the plan — then approve it before execution begins.
Plan Mode is particularly valuable because it saves tokens in the long run. Getting the plan right before building means fewer back-and-forth corrections, fewer failed attempts, and less wasted context.
You can also type /permissions in the terminal to see a full list of what permissions are currently configured.
The Four Effort Levels
Claude also has an effort level setting that controls how much reasoning it applies to each request:
- Low (Fastest) — minimal reasoning, good for simple file lookups or quick questions. Fastest and cheapest.
- Medium (Balanced) — the default for most tasks. Ideal for routine debugging, standard code changes, and everyday development. Balances speed and quality well.
- High (Default/Complex) — designed for complex coding problems, multi-file refactors, and tasks that require deeper thinking. Similar to how previous versions of Claude behaved by default.
- Max (Deepest) — available on Opus 4.6. Maximum reasoning depth for complex architectural problems and hard debugging. Slower and uses more tokens, but worth it for the most difficult tasks.
A good rule of thumb: use Low or Medium for small tasks, High for anything involving multiple files, and Max only when you’re genuinely stuck on something complex.
Core Features and Slash Commands
The @ Mention
Type @filename or @folder/ in your prompt to give Claude direct context about specific files without copying and pasting. For example:
“Look at @components/Header.astro and update the navigation links.”
This keeps Claude focused on exactly what’s relevant instead of scanning your entire codebase.
The Most Useful Slash Commands
| Command | What It Does |
|---|---|
/help | Shows all available commands and documentation — use this when you’re lost |
/compact | Summarizes conversation history to save tokens and free up context space |
/clear | Clears the conversation entirely and starts fresh |
/cost | Shows how many tokens you’ve used and what it’s costing |
/context | Shows how much of your context window has been used |
/model | Lets you switch between Claude models (Sonnet, Haiku, Opus) |
/review | Audits your current pending code changes — acts like an AI pull request reviewer, flagging bugs, improvements, and compliance issues with inline comments |
/terminal | Opens a terminal so Claude can run commands like npm test or npm run dev |
/generalconfig | Opens permission and mode settings |
/permissions | Shows the full list of current permission configurations |
The /review command is particularly underused. Before you commit any significant changes, run /review and let Claude audit everything. It reads your diff and posts findings as if it were a senior developer reviewing a pull request.
The CLAUDE.md File
The CLAUDE.md file is a markdown file you add to your project root that Claude Code reads at the start of every session. Think of it as a briefing document for your AI developer — it tells Claude how to behave, what your standards are, and what your project is about, every single time.
Without a CLAUDE.md, Claude starts every session with no memory of your previous conversations. With one, it walks in already knowing:
- What stack you’re using and why
- Your preferred libraries and coding conventions
- Review checklists before deploying
- Brand guidelines and tone of voice
- What to avoid and what to always do
You can create one by typing /init in Claude Code — it’ll analyze your project and generate a starter CLAUDE.md automatically. From there, you refine it over time by telling Claude what to add.
For a full breakdown of what to include, what to skip, and real examples you can copy, read my detailed guide: How to Write the Perfect CLAUDE.md File.
Claude Skills
Claude Skills are markdown files that teach Claude a specialized capability — once. After a skill is installed, Claude applies it automatically whenever it’s relevant.
For example:
- Install the Brand Guidelines skill with your logo, colors, and fonts — and every time you ask Claude to make marketing content, it’ll follow your brand automatically.
- Install the Frontend Design skill — and Claude will build polished, production-quality websites rather than basic ones.
- Install the PDF skill — and Claude becomes a full document processing tool.
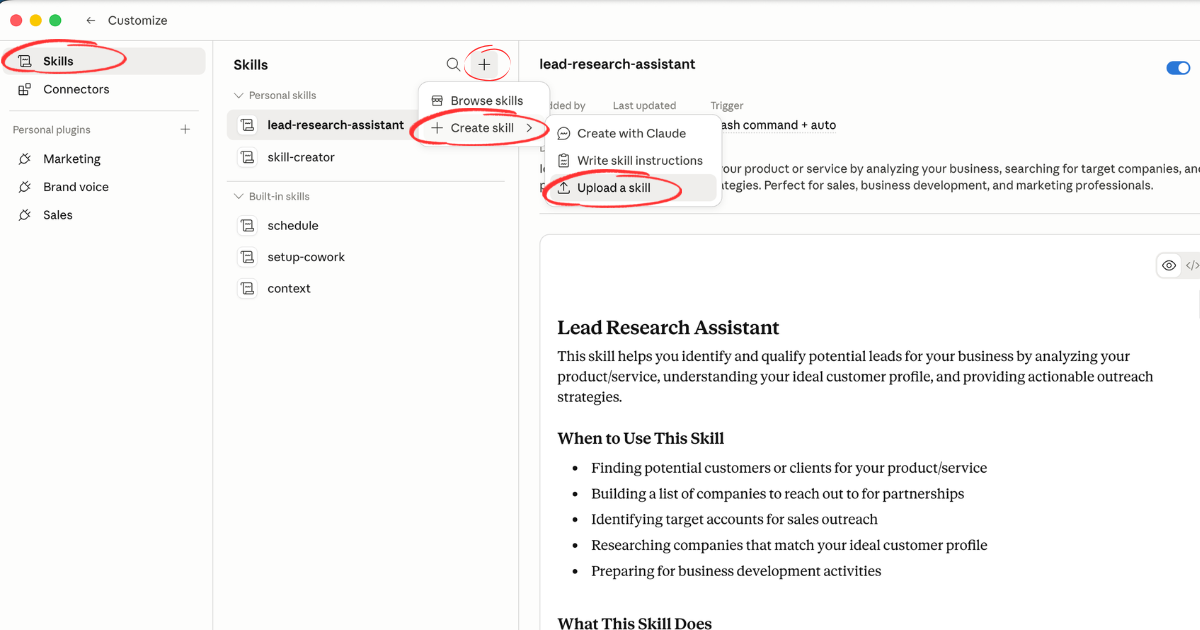
How to Install a Skill
Most skills are hosted on GitHub. The general process:
- Find the skill’s
skill.mdfile on GitHub - Click Raw and copy the URL
- In Claude Code, run:
/skills install https://raw.githubusercontent.com/[skill-repo-path]/skill.mdClaude downloads and configures it automatically. You’ll get a confirmation once it’s ready.
Skills are also usable on Claude Web (no VS Code needed) — just upload the skill.md file as a document inside a Claude Project, and Claude picks it up automatically.
For my full list of recommended skills, check out: Top 10 Claude Code Skills — How to Start Using Them.
Want help automating your business workflows with Claude?
I'm happy to help — get in touch via the link below.
Get in Touch →Managing Context
Context is the amount of information Claude can hold in memory during a conversation. Every message, every file it reads, every response it writes — all of it consumes context. When you run out, Claude starts losing track of earlier parts of your conversation.
Here’s how to manage it:
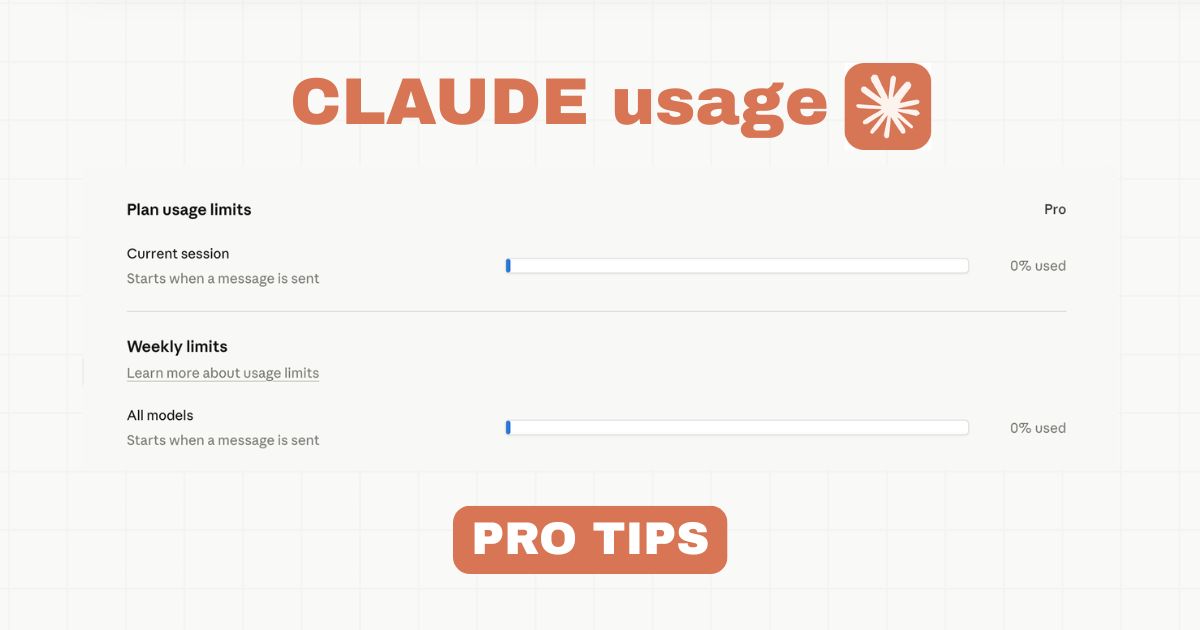
Check Your Usage
Type /context to see how much of your context window has been used. Different models have different context windows — Opus has a larger one, Haiku a smaller one. You’ll see exactly how many tokens you’ve consumed and how much space is left.
Use /cost to check how much your current session has cost in tokens.
Compress with /compact
When context starts filling up, type:
/compactThis summarizes everything so far into a compressed version, freeing up space for Claude to think clearly again. Claude also does this automatically if you reach the context limit — but it’s better to do it proactively before things start degrading.
A good rule of thumb: run /compact every 30–40 messages, or whenever Claude starts giving answers that feel slightly off-track.
Start Fresh with /clear
If you’ve finished a feature or hit a wall, /clear wipes the conversation entirely and starts fresh. Use this when you’re moving to a completely different task and don’t need any of the previous context.
Use the Right Model for the Job
Not every task needs Opus. Here’s a rough guide:
- Haiku — fast and cheap. Good for simple edits, copy changes, and quick lookups.
- Sonnet — the best balance of capability and cost. Handles the vast majority of development tasks well.
- Opus — the most powerful. Reserve it for genuinely complex architectural decisions, hard debugging, or high-stakes refactors.
Switch models anytime with /model. Most of the time, you don’t need Opus — Sonnet is more than enough, and it’ll stretch your token budget much further.
The 5-Step Workflow: From Idea to Launch
Now that you have the foundations, here’s the exact workflow I recommend when you’re building something new.
But first — a real problem most beginners run into: you have multiple ideas and you want to build all of them. Two things will stop you: time and tokens. If you start five projects at once, you’ll max out your usage limits fast, and you’ll spread your focus too thin to ship anything.
So before you build anything, you need to validate which idea is actually worth building.
This is exactly what LeadLanding.dev is for — it’s the fastest way to test market pull before writing a single line of code. You can build a landing page with a simple prompt or a template, embed a lead collection form, launch in under 5 minutes, and see how many people register interest. Do this for a few ideas side by side, and the data will tell you which one has real demand. By launch day, you’ll already have a list of people ready to become your first users.
Once you know which idea to focus on, here’s the 5-step workflow:
Step 1: Draft Your Idea
Write a short but detailed description of what you want to build. Not just “a time tracking app” — something like:
“I want to build a time tracking app for students to know the amount of time they study for, set goals, and keep themselves accountable. I want a free tier, and a paid tier for extras like reminders, recommendations, and advanced analytics.”
The more specific you are up front, the less you’ll need to correct later.
Step 2: Use Plan Mode First
Switch Claude to Plan Mode, paste your idea, and let it do its research. It’ll analyze the requirements, identify what it needs to build, flag potential issues, and present you with a structured plan before touching any code.
Read through the plan. Ask questions. Push back on anything that doesn’t make sense. Refine it until you’re satisfied — then approve.
This step saves significant time and tokens. Getting the architecture right before building means far fewer dead ends.
Step 3: Get Your First Draft
With the plan approved, Claude builds the first version. If it doesn’t automatically start a local server, ask it to:
“Launch a localhost server so I can see what this looks like.”
Now you have something visual to react to. This is where the real iteration begins.
Step 4: Prompt and Adjust Toward Your MVP
From the first draft, work iteratively. Don’t try to build everything at once — focus on getting to a simple, shippable MVP. Each session, pick the most important thing to fix or add, prompt specifically, review the changes, and move forward.
Use /compact regularly to keep your context clean, and use /review before any significant commit.
Step 5: Deploy
When you’re ready to launch, you’ll need to:
- Buy a domain
- Connect it to your GitHub repository
- Set up hosting
For a full walkthrough on how to host your website for free, check out the guide I put together — it covers the whole deployment process step by step.
Nas’ Note: You Don’t Need to Code to Ship
The gap between technical and non-technical founders is closing fast. Claude Code, combined with the workflow above, means you can go from idea to live product without a development team, without a CS degree, and without waiting weeks for someone else to make changes for you.
The founders who win aren’t the ones with the cleanest code. They’re the ones who ship the fastest and learn from real users.
Start here. Set up VS Code, install Claude Code, try Plan Mode on your next idea. See what you can build in a single afternoon.
Then come back and tell me what you shipped.
Liked what you just saw? Follow me on Youtube or connect on LinkedIn for more insights on growing your business online.
Video Guides you might like:
 How to use Claude Code to build Apps
  10 Best Claude Code Skills for beginners
  How to create AI Video Animations with Claude + Remotion
  How to use Claude Code to build a Website
  How to use Claude Skills for beginners
  How to write the PERFECT CLAUDE.md file
  Automate 80% of your Marketing with Claude
  How to use Claude Code — The basics
  Work 2X Faster with Claude Cowork
  How to NEVER Hit Claude Usage Limits Again